I have been curious about homebrewing sake for several years and finally decided to try it after watching a youtube video that made the process seem much easier than I had read before. However even though the simplicity of the process in this video inspired me, I decided to do more research and ended up creating a process a tiny bit more complex. My process is mainly based on the recipe posted on the Vision Brewing website. This is the company that produces the Sake Homebrew Kit which is basically the base for creating the Kome-koji and their basic instructions are pretty easy to follow. They also offer some more advanced instructions that I might try later. And the recipe is enhanced by using the water chemistry suggestions from this article in the Americam Homebrewers Association (membership required to access content).
Ingredients
The following are the ingredients required to homebrew sake:
- Sake Homebrew Kit
- Sake Yeast
- Kagayaki Select California Premium Short Grain Rice (2 Kg)
- Epsom Salt
- Morton Salt Substitute
- Lactic Acid 88%
- Distilled Water (1 gallon)

Equipment
As a beer homebrewer I already had lots of equipment that I was able to use for sake making. However I did purchase a few items that made the process easier.
- Large stainless steel pasta cooker with steamer attachment
- Fermonster 3 Gallon Carboy
- Airlock with stopper
- Two large strainers
Process
Step 1: Make Kome-Koji
The first step in sake brewing is to produce kome-koji which is rice mixed with a special kind of mould called koji-kin and allowed to ferment at high temperatures for a copule of days. In this process the mould converts the starches in the rice to simpler sugars that later can be consumed by the sake yeast.
- Wash, soak, drain and steam 400 grams of rice
- Once the rice cools down to 86°F (30°C) mix with koji-kin in the sanitized fermentor
- Add airlock and let it ferment for 48 hours at 86°F (30°C)
- Mix every 12 hours by carefully shaking fermentor
- The rice should become whiter in color, and you might see some white filaments on the rice thanks to the koji-kin mould. I personally did not see those. The rice should also have a cheese/kefir like aroma


Step 2: Make Sake + Primary Fermentation
Now that you have the kome-koji done, the next step is to make the sake. The kome-koji will continue converting rice starches into sugars and the sake yeast will convert sugars into alcohol. These two fermentations will work together to produce the final result: delicious sake
- Wash, soak, drain and steam 1500 grams of rice
- Prepare 1 gallon of water mixed with:
- 2 ml Lactic Acid 88%
- 0.3 g Epsom Salt
- 3.5 g Morton Salt Substitute
- Once the rice cools down to 86°F (30°C) mix it with the kome-koji, the prepared water and the sake yeast in the fermentor
- Add airlock and let it ferment for 2 weeks at 66°F (18.8°C)


Step 3: Secondary Fermentation
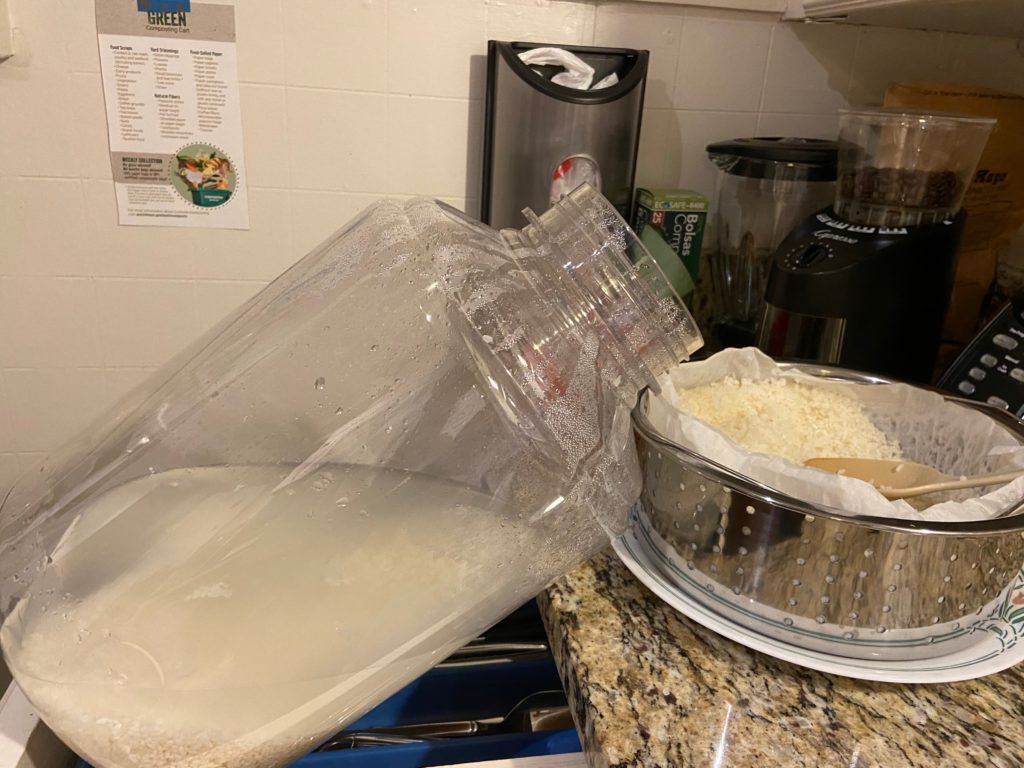
After two weeks transfer the sake from the 3 gallon fermentor into a 1 gallon jug. I don’t recommend using an auto-siphon for this because you will get some rice into the jug. Instead place a sanitized (boiled) cotton tote bag or grain bag in a sanitized bucket and pour all the contents from the fermentor into it. Use something (e.g camera tripod) to lift the bag above the bucket so you can collect all the liquid via gravity. I was able to fill a 1 gallon jug all the way to the neck which later proved to be a problem since the sake fermentation was still very vigorous and some “krausen” (foam) was produced and filled the airlock which required me to replace the setup with a blow-off tube. Allow for 2 more weeks of fermentation at the yeast recommended temperature range 60-75°F (15-24 °C).
Do not discard the spent rice. This rice contains both the koji-kin mould and the sake yeast and can be used to inoculate a second batch of sake allowing you to skip step 1 and saving you from buying more sake yeast. According to this instructables post, the kome-koji can last up to 10 days refrigerated so you do need to make that second batch soon.
Update – 01/15/2021
The previous paragraph proved not to be accurate. Using the spent rice from a previous batch does not work as I anticipated. The result was a very flavorless and weak sake. You can barely feel any alcohol in it. I believe the spent rice had enough koji-kin to convert starches into sugars, but the yeast didn’t do its part. I’m not sure what caused this, but one possible theory is that the commercial yeast I used on the first batch came with some yeast nutrient in the package. For the second batch I didn’t think of adding any yeast nutrient. Now, on batch #3 I did add yeast nutrient (even before tasting batch #2), so this batch might turn out better.


Next Steps
The resulting sake was good. The sake tastes a bit cheese and sour, but it is still enjoyable and I’m drinking it with friends and they tell me they like it. The sourness could be tamed by reducing the amount of lactic acid used in the water treatment. Maybe a few extra weeks will also help the flavors since this sake is fairly young (4 weeks old).
After making my first batch of sake I wanted to make a second batch using some of the spent rice of the first batch. If this second batch works, it means I can keep this process and skip step 1. The second batch has already been fermenting for 2 weeks and the sake is much thicker than the first batch.
For the second batch I wasn’t able to get the same brand of rice, but I got one very similar. I also got a bag of sweet rice as I want to experiment with this very different rice and see what the resulting sake tastes like.


Update 1/15/2021
So far I have done 3 batches of sake:
Batch #1
Did everything from scratch following instructions and sake turned out well.
Batch #2
Tried to save time/money by skipping the creation of the kome-koji and the purchase of sake yeast and instead inoculated the sake with the spent rice from batch #1. As I mention above this produced a flavorless and weak sake. My educated guess is that the koji-kin did convert the rice starches into sugars (I can tell by the way the rice texture changed from firm grains to mush) but the yeast did not convert sugars into alcohol and aromatics/flavors (phenols and esters). One possible explanation is that there was no yeast nutrient for the yeast to reproduce.
Experiment: Recovering batch #2
If my theory is correct, and the sake from batch #2 currently contains converted sugars produced by the koji-kin, all I need to do is add yeast to it and the sugars should then convert into alcohol, aroma and flavor.

So I went ahead and split part of batch #2 into two ½ gallon mason jars:
- One of the mason jars contains 1000 ml of sake and 250 ml of the most cloudy sake from batch #1. This very cloudy sake from batch #1 seems to have viable yeast since I can tell it built some pressure in the bottle and the sake even has a slight hint of carbonation.
- The other mason jar contains 1000 ml of sake and 1 teaspoon of kveik yeast. This is a Norwegian beer yeast that contains multiple strains and can ferment under very tough conditions. We’ll see if this yeast which is very good at fermenting maltose, can ferment glucose. I did not use sake yeast because I had none available and it is expensive.
Batch 3
For this batch I used the spent rice from batch #2, so I’m afraid I will run into similar (or worse) problems, although one difference is that I did add a teaspoon of yeast nutrient to it. This batch is less than a week old, so I’m several weeks away from knowing how it turned, but anything I learn with batch #2 experiments can be applied to batch #3 and future batches.